The sales module in Lucy is available starting from the Lucy Invoicing subscription.
You can create invoices or credit notes from the Invoicing tab via the Invoices overview.

Important to note: In Lucy, it is not possible to create test invoices or credit notes, also not during the trial.
- Creating a Sales Invoice
- Add additional notes & Attachments
- The lay-out of your invoice
- Finalizing your invoice
- Creating a Credit Note
- Sending Options in Lucy
- Checking Invoice Delivery
- Post-Sending: Actions and Management
Creating a Sales Invoice
Click the + New Invoice button. In the screen that appears, select "Invoice" as the type. Then, fill in the required fields.

When creating a sales invoice in Lucy, you can configure the following fields in the Invoice info section:
- Client: Search your existing database or create a new client immediately. Clients details can always be modified later.
- Invoice Number: The final number is only assigned once the invoice is finalized and sent, based on your invoice settings.
- Client Reference: Enter an order or PO number here. This data is automatically included in the XML element <cac:OrderReference>.
- Payment Reference: The structured communication is automatically generated based on your invoice settings upon finalization.
- Invoice Date: Set to today's date by default, but can be adjusted manually. Please note: Backdating is not possible in Lucy. To ensure a correct chronological order, the date of a new draft or invoice cannot be earlier than the date of your last finalized invoice. Invoices with an earlier date cannot be saved or sent. Please make sure your billing always follows the correct timeline.
- Due Date: Can be entered manually or calculated automatically based on your invoice settings.
- Payment Method: When creating an invoice, you determine whether it is still due or has already been paid. You can manually choose between the methods 'Credit transfer' or 'Already paid'. You can also automate this by configuring a default value in your invoice settings. The text on the invoice will automatically adapt based on your choice:
Credit transfer: A payment request (including payment details) is added.
Already paid: A notification appears stating that the invoice has already been settled. Once the invoice is sent, its payment status will also automatically be set to 'Paid'.
- Delivery Date: This field appears automatically when using specific VAT codes (e.g., intra-community supply of goods/services).
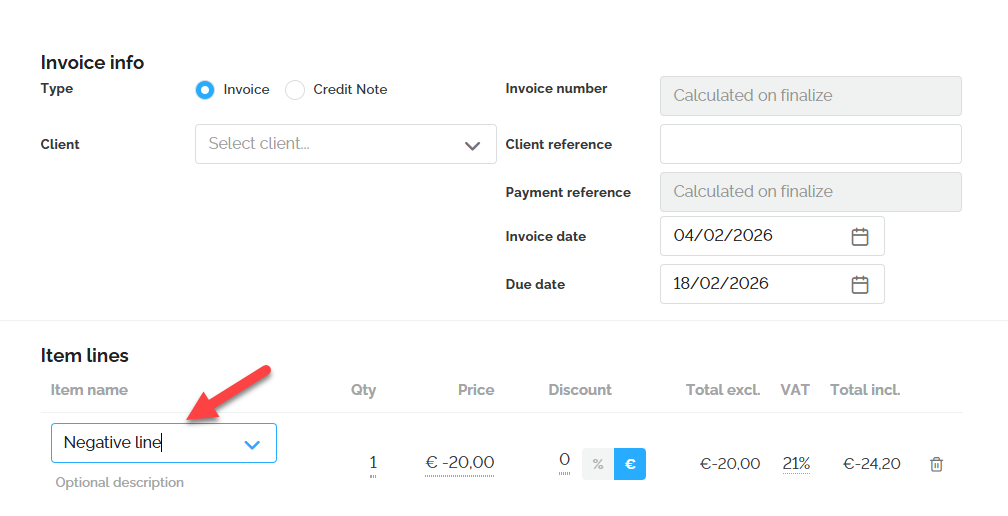
In the item lines section, you can then add your articles to the invoice:
- Existing Article: Select pre-created articles from the dropdown menu. All fields remain adjustable per line.
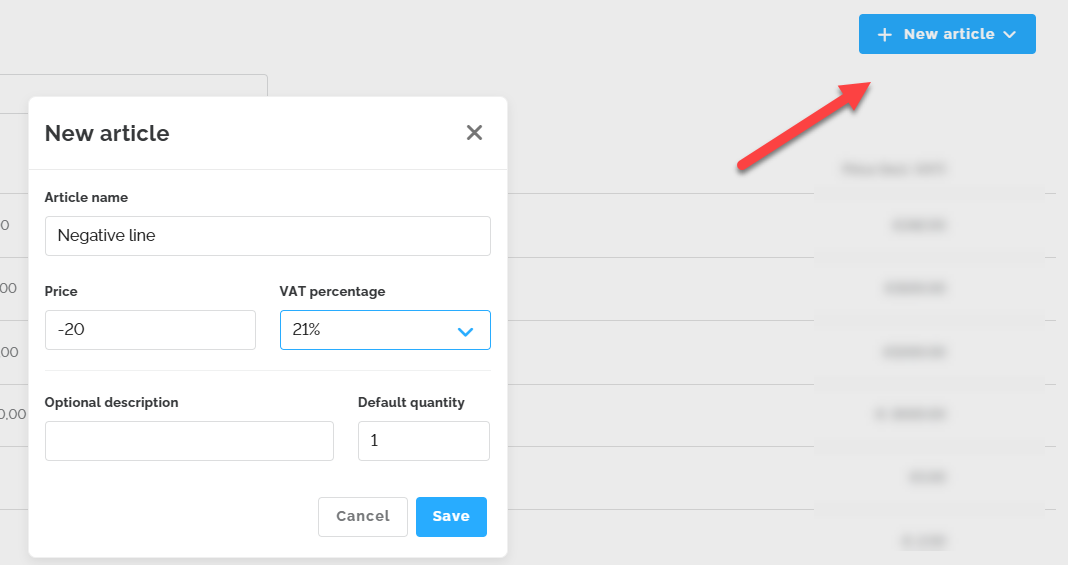
- New Article: Add an item manually. Note: This will not be saved to your permanent article list.
- Extra Description: Add an optional description to any line for further clarification.
Important: The following functionalities are currently not possible in Lucy. We are exploring how to make this possible in the software in the future: It is not possible to add a negative line to your invoice. However, you can create an item with a negative amount and add it to the invoice.It is not possible to enter prices including VAT. Item prices must be entered excluding VAT, after which Lucy automatically calculates the VAT. Is is not possible to send a Peppol invoice to you client's GLN number.
Add additional notes & Attachments
With 'clickable chips,' you can easily add legally required notifications to your invoices. Currently, it's not possible to customize these chips or create personalized ones. However, you can manually enter the desired text in the field to have it displayed on the invoice.
You can also add attachments to your invoice. You have the option to add up to three PDF documents, each of which must not exceed 2 MB.

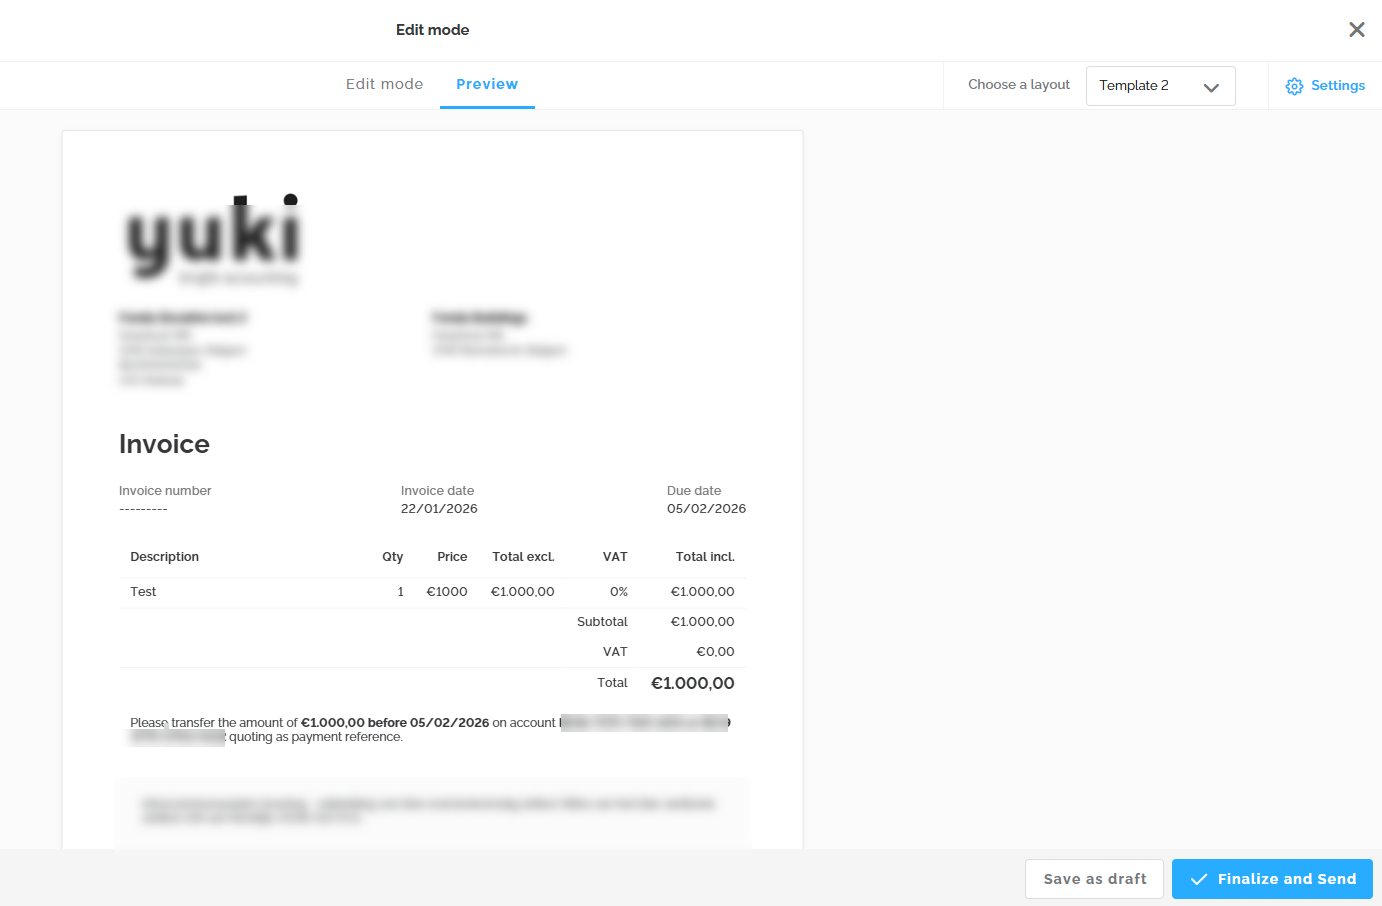
The lay-out of your invoice
You can always preview how the invoice will look by clicking on the 'Preview' tab, where you can also choose between two different layouts (templates). Besides adding a logo and footer via the settings, you cannot structurally change or further customize the layouts in Lucy.
Finalizing your invoice
Once the invoice or credit note is ready, you can save it as a draft or finalize and send it.
Draft invoices can be reopened from the main overview to continue finalizing them or can be deleted.

Important: The invoice number and payment reference only appear on the finalized invoice. The same goes for the QR code, which is automatically added when the invoice is completed. You do not need to add the QR code yourself, and it cannot be omitted.
Creating a Credit Note
There are two ways to create a credit note, depending on whether the original invoice was created in Lucy or not.
- To create a credit note for an external invoice, follow these steps:
Go to the Billing > Invoices tab.
Click the + New Invoice button.
In the dropdown menu, select "Credit Note" as the type.
Manually fill in the required fields to complete the credit note.

- If the invoice was created in Lucy, you can automatically copy the invoice details to your credit note:
Go to the overview via Billing > Invoices.
Locate the relevant sales invoice.
Click the three dots (...) at the end of the invoice line.
Select the option "Create Credit Note". All data from the original invoice will be filled in automatically.

Note: By default, the credit note is assigned the same invoice date as the original invoice. If desired, you can manually adjust this date to the current day.

The numbering of credit notes follows a separate sequence and cannot be modified.
Sending Options in Lucy
Once your invoice is ready, you can choose how to send it to your client. In Lucy, you have two channels to choose from:
1. Send via Peppol
- Clients registered on the Peppol network are identified by a green checkmark that appears next to Send via Peppol.
- You can disable the 'Email' option to send the invoice exclusively via Peppol. In this case, no accompanying email text will be sent.
2. Send via Email
Invoices for individuals, clients without a VAT number and clients not on Peppol can easily be sent via email. Simply select the option 'Send via Email'.
You can also choose to send the invoice via both Peppol and email.

Checking Invoice Delivery
Want to know if an invoice has been successfully sent to your client? Although there is currently no central log available, you can easily check the delivery status per invoice.
How do I check the delivery status?
You can find the delivery details directly within the relevant invoice. Follow these steps:
- Open the desired invoice.
- Navigate to the Detail section.
- Under this section, you can consult the following information:
- Delivery Method: This indicates whether the invoice was sent via the Peppol network or via email. If a delivery fails, it will also be shown here.
- History: You can see exactly when the invoice was sent.
- Reminders: If a payment reminder has been sent, the date and time will also be displayed in this overview.

What to do if Peppol delivery fails?
Sometimes an invoice is not successfully delivered via the Peppol network (for example, due to a temporary glitch or an invalid recipient ID).
If the delivery failed you can manually trigger the delivery again. Click the 'Send reminder' button in the invoice.

This will resubmit the invoice to the network. Uncheck the 'Send via email' option to ensure the invoice is exclusively resent via Peppol.
Wait a moment and refresh your browser page. Go back to the Detail section to see if the status has updated to "Sent via Peppol".
Is the delivery still unsuccessful after refreshing the page? Please contact our support team.
Post-Sending: Actions and Management
A created invoice is automatically placed in the Lucy Inbox, from where it can be sent to the accountant (accountancy software).
From a finalized and sent invoice, you can perform the following actions:
- Send a reminder maximum once per day
- Duplicate the invoice
- Print the invoice
- Download the invoice as a PDF and XML (if available)
- Create a credit note

Important: It is not possible to delete or modify the content of a finalized invoice. We recommend issuing a credit note for corrections to a finalized invoice. This ensures your records remain accurate and consistent.